Wi-Fi Setup on Google Router Access: A Step-by-Step Guide
Are you looking to set up a reliable and fast internet connection using Google's Wi-Fi router? Look no further! In this article, we will guide you through the process of setting up your Google Wi-Fi router, accessing its settings, and troubleshooting common issues. We will also cover some of the key features and benefits of using Google's Wi-Fi router. Before you begin, make sure you have the following: * A Google Wi-Fi point or points (if you have multiple devices) * A Google account * A mobile device (one of the following: iOS, Android, or Chrome OS) * A computer or laptop (optional)Step 1: Find a Spot for Your Wi-Fi Point
Place your Wi-Fi point in a central location, ideally in a spot where it can cover most of your home or office. This will ensure that you get the best possible Wi-Fi coverage and minimize dead spots.Step 2: Plug in Your Wi-Fi Point
Plug in your Wi-Fi point to a power source and make sure it is turned on.Step 3: Get the App
Step 4: Set Up Wi-Fi
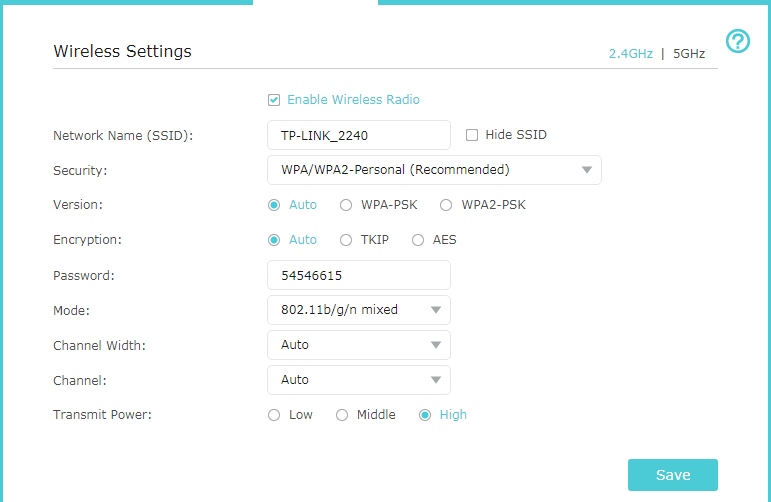
Open the Google Home app and follow the on-screen instructions to set up your Wi-Fi network. You will be prompted to create a network name and password, as well as connect your device to the network.Accessing Your Google Router Settings
To access your Google router settings, follow these steps: 1. Open the Google Home app and navigate to the network settings page. 2. Tap on the three vertical dots in the top right corner and select "Settings." 3. Scroll down to the "Advanced settings" section and tap on "Router settings." 4. You will be taken to a new page where you can access your router's settings, including Wi-Fi settings, network name and password, and advanced settings.Troubleshooting Common Issues


:max_bytes(150000):strip_icc()/Google_Home_WIFI_03-403e315aa5ec4bb5b9800e4aeff16470.jpg "Nest WiFi Router and 2 Points (3 Pack) Review - Mini PC Reviewer")


